This is the body of my new post.
Author Archives: Code Docta
My new title
This is the body of my new post.
How to make an HTTP Post with the Requests Package in Python 3.4

A look from Ipython Notebook inverted.
Twitter @CodeDocta
Making an HTTP POST Request
import requests
from pprint import pprint
URL = 'http://127.0.0.1:5000/post'

REFERER  = 'http://127.0.0.1:5000/forms/post'
UA = 'Mozilla/5.0 (Windows NT 6.1; WOW64; rv:37.0) Gecko/20100101 Firefox/37.0'

HEADERS = {
    'Host': 'httpbin.org',
    'Referer': REFERER,
    'User-Agent': UA,
    'Accept': 'text/html,application/xhtml+xml,application/xml;q=0.9,*/*;q=0.8',
    'Accept-Language': 'en-US,en;q=0.5',
    'Accept-Encoding': 'gzip, deflate',
    'DNT': 1,
    'Content-Type': 'application/x-www-form-urlencoded'
    }
PARAMS = {
    'custname': 'Nick',
    'custtel': '777-867-5309',
    'custemail': 'noob@lala.com',
    'size': 'medium',
    'topping': 'onion',
    'delivery': '18:20',
    'comments': 'I woutld like extra peppers please.'
}

PROXY = 'proxy goes here'
PROXIES = {
  "http": "http://" + PROXY,
  "https": "http://" + PROXY,
    }

resp = requests.post(URL, data=PARAMS, headers=HEADERS, proxies=None)
resp.close()
resp.status_code
Cool we have our 200
This means it worked and we can do something else, like save all the inputs to a databease or file.
if resp.status_code == 200:
    pprint(resp.text)
Without pprint it looks a little messy, try it on an real webpage.
pprint = pretty print
Well, that’s it…
Ok, so I lied. Let’s do some other cool stuff.
If is not the way to go here we need some exception handling.
PARAMS = {
    'custname': 'Nick',
    'custtel': '777-867-5309',
    'custemail': 'noob@lala.com',
    'size': 'medium',
    'topping': 'mushroom',
    'delivery': '18:20',
    'comments': 'can you make it free?'
}

try:
    r = requests.post("http://httpbin.org/pos", data=PARAMS, proxies=PROXIES)
    print(r.text)

except Exception as postError:
    print('AHHH... Your end of the world message!!!')
    print(postError)

r.close()
I suggest you read deeply into the Exception Handling documentatoin there are many and Exception is the catch all. At some point I will do a tut on this module.
PARAMS = {
    'custname': 'Nick',
    'custtel': '888-867-5309',
    'custemail': 'noob@lala.com',
    'size': 'medium',
    'topping': 'mushroom',
    'delivery': '18:20',
    'comments': 'can you make it free?'
}

try:
    r = requests.post("http://127.0.0.1:5000/post", data=PARAMS, proxies=PROXIES, timeout=5)
    print(r.text)

except Exception as postError:
    print('You can put whatever on top of the real error.')
    print(postError)

r.close()
As you can see I did not change the proxy to an real proxy however you see the error is quite telling.
You can see some defaults there like port, max redirects and I snuck in a timeout on you. There are 2 time outs one for the read and one for the server connection. Now that you are awhere you can go see more about them in the Requests documentation. It is done well so don’t be scared.
Timeouts http://docs.python-requests.org/en/latest/user/advanced/#timeouts and http://docs.python-requests.org/en/latest/user/quickstart/#timeouts
Requests has its own exception handling too http://docs.python-requests.org/en/latest/user/quickstart/#errors-and-exceptions
Let’s see how to unpack a list into variables. I do this because I can read without thinking about do I have the correct list item when I try to debug.
pList = ['77.888.45.80.8080', 'Jon Doe', '555-867-5309', 'Jon.Doe@Amail.com', 'large', 'mushroom', '12:00', 'Make sure that coke is a diet coke!!']
PROXY, CUST, PHONE, EMAIL, SIZE, TOP, TIME, COMM = pList

pList
Now we can use dynamic parameters…
PROXIES = PROXY
PARAMS = {
    'custname': CUST,
    'custtel': PHONE,
    'custemail': EMAIL,
    'size': SIZE,
    'topping': TOP,
    'delivery': TIME,
    'comments': COMM
}

try:
    r = requests.post("http://127.0.0.1:5000/post", data=PARAMS, proxies=None, timeout=5)
    print(r.text)

except Exception as postError:
    print('You can put whatever on top of the real error.')
    print(postError)

r.close()
When we are done with or memory slots you can delete them with the “del” keyword…
PARAMS
del PARAMS
This way we don’t have memory leaks and build up. Use this on variables and iterables when you no longer need them.
PARAMS
Twitter @CodeDocta
Scraping a Form for Input Fields Python 3.4

Form scrape using Regex and some Xpath.
Twitter @CodeDocta
import requests, regex
from pprint import pprint
from lxml import html
from lxml.etree import XPath
URL = 'http://httpbin.org/forms/post'
resp = requests.get(URL, )
respText = resp.text
resp.close()
print(resp.status_code)
respTree = html.fromstring(respText)
inputs = respTree.xpath("//input")
pprint(inputs)
print(type(inputs))
print(type(inputs[0]))
for x in inputs:
    print(x)
Need to convert to string before you can split into another list…
firstA = inputs[0]
firstB = str(inputs[0])
print(type(firstA))
print(type(firstB))
itemSplit = firstB.split()
itemSplit
Now you can get at the name and type.
Notice… I did not use lowercase t as “type” is a python keyword.
name = itemSplit[2]
Type = itemSplit[3]

print(name)
print(Type)
Or just regex it…
You can see the regex object, it returns a list.
c = regex.findall(r"(?<=name=').*?(?=')", firstB)
print(c)

print(type(c))
print(c[0])
t = regex.findall(r"(?<=type=').*?(?=')", firstB)
print(t[0])
Now you can loop thru inputs list and convert to string and add to another list or…
just Xpath the //form and regex what you need.
Let’s put everything into a list with regex instead.
But first I will show you the form real quick….
form = respTree.xpath("//form[@method='post']")
print(type(form))
print(type(form[0]))
print(str(form[0]))
Not what we expected
Hmmm… Well, this is a pain!! let’s just try regex and I will explain all tha xpath stuff later…give you a hint tho “IO” package/module.
allTypes = regex.findall(r"(?<=type=').*?(?=')", resp.text)
allTypes
Oops! what happened?
We closed the connetion like good boys and girls is what happened.
Good thing we stuck it in a variable!!
Do you see what else?
Look at the regex closely.
Here is the HTML so we can see what we are doing.
pprint(respText)
Notice the quotes?
I switched them, now we can use the regex!
allNames = regex.findall(r'(?<=name=").*?(?=")', respText)
allNames
allValues = regex.findall(r'(?<=value=").*?(?=")', respText)
allValues
allTypes = regex.findall(r'(?<=type=).*?(?=\s)', respText)
allTypes
This is not looking good, my lists are uneven 😦
print('Names ' + str(len(allNames)))
print('Types ' + str(len(allTypes)))
print('Values ' + str(len(allValues)))
Notice I converted integers into Strings there?
The “len” function returns an int, but not anymore.
allLabels = regex.findall(r'(?<=<label>).*?(?=</label>)', respText)
allLabels
So what should I use?
The great thing is that is totally up to you and your needs.
Now you know several ways and yes there are several more.
This regex syntax is good for “re” packeage too.
I used new “regex” package as it will replace “re” soon.
Just “pip install regex” to get it.
As for the Xpath, I will be doing a seperate tutorial for this as it is more complex.
What to do now?
The obvious utily is to just see and create the post code manually Otherwise, think outside the box. 😉
Think about how you can automate this for most pages…
Install Python 3.4 with Anaconda 3 Distribution (Distro) Part 1
Step 1: Download Anaconda 3 Distro and Install Python 3.4
The fallowing tutorials geared for Python 3.x+ on a 64bit Windows 7 system. Go to the Continuum site and download Anaconda 3.
However, the process is the same for Python 2.7.
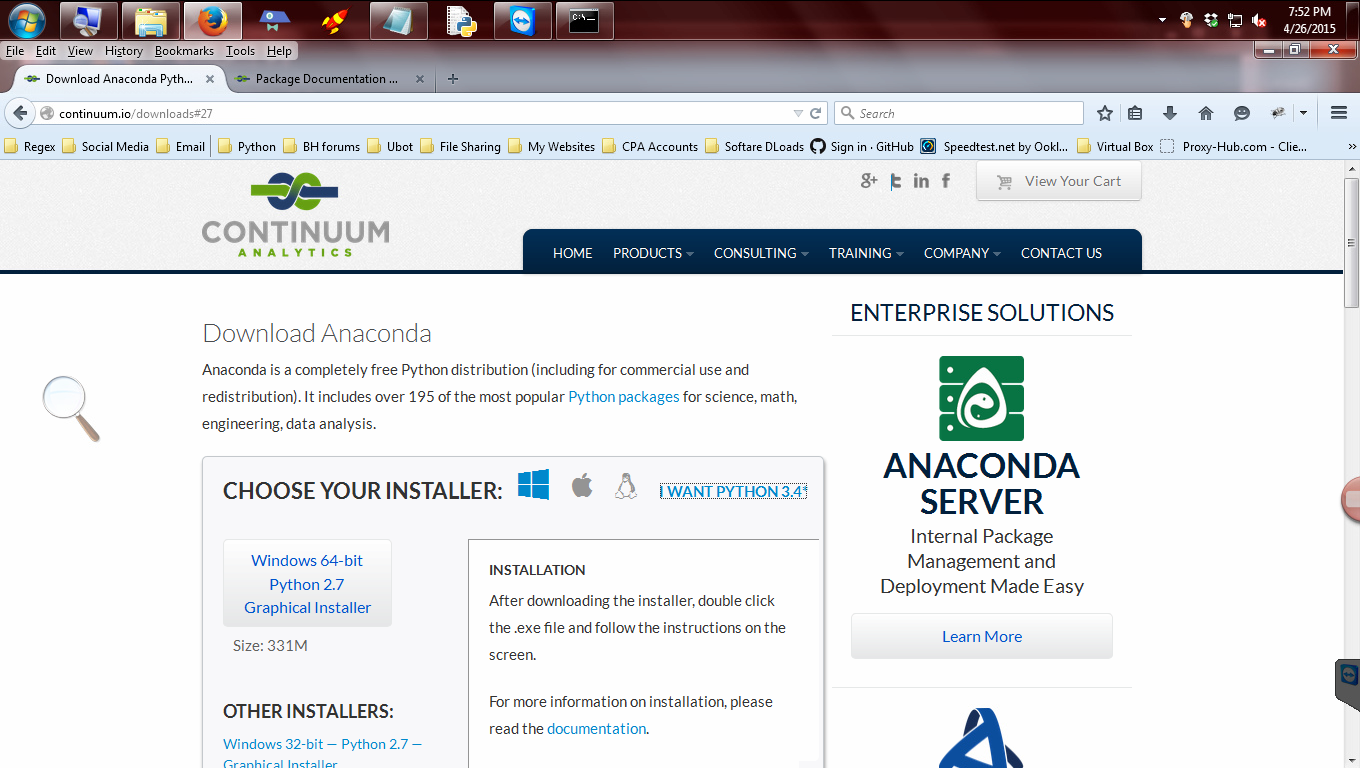
On the right you can see the link for Python 3
Click on “I want Python 3” link to get the correct version. Then make sure it is for 64 bit.
After you have selected the correct version click the link to download.
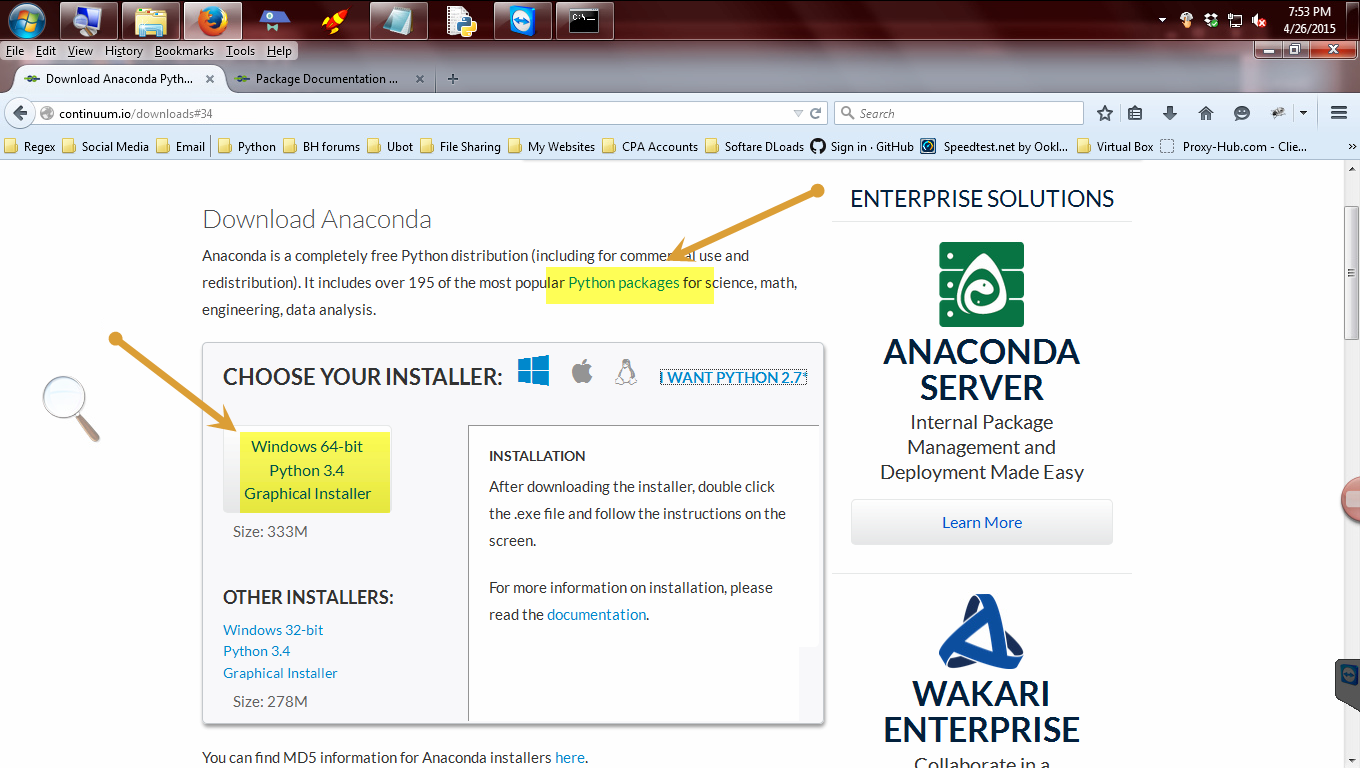
Click the highlighted area to download 64 bit Anaconda3 Python 3. While waiting for the file to download…
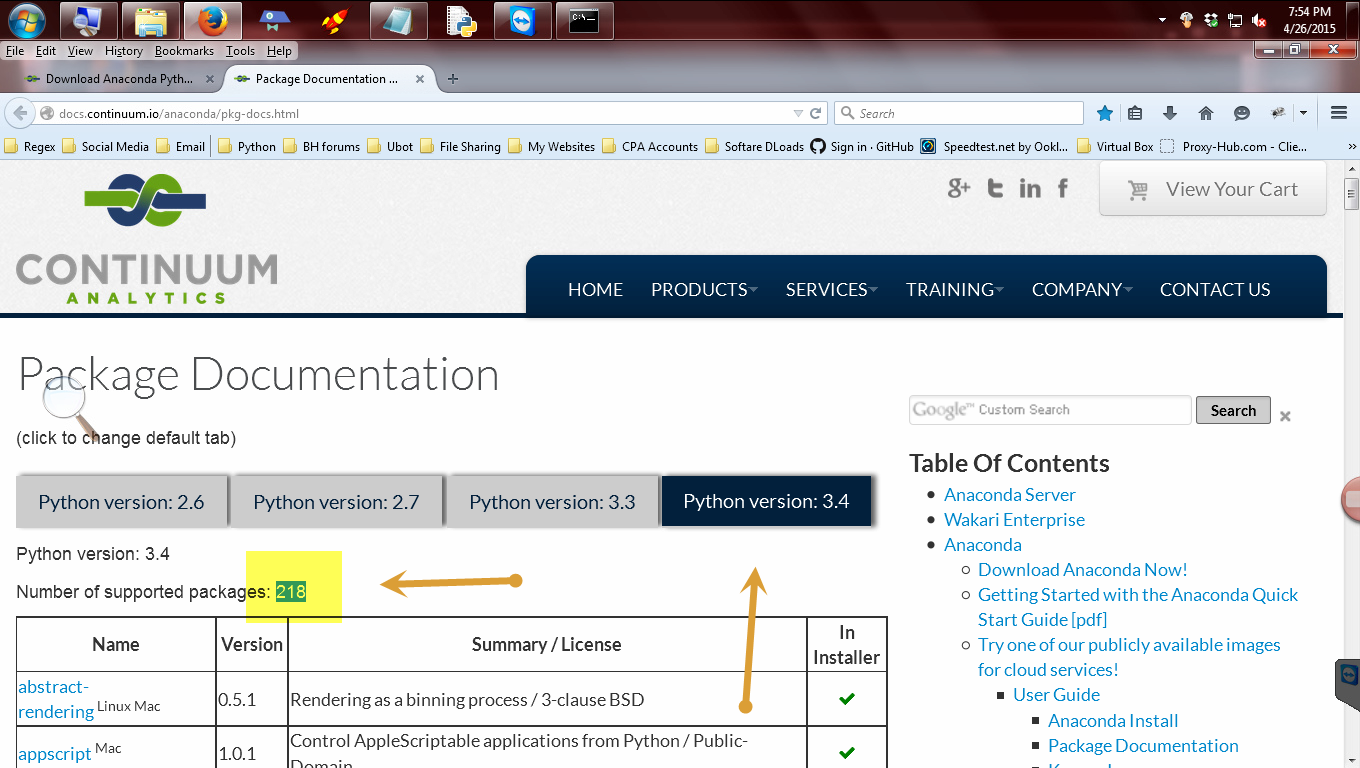
Click on Packages to see the list that comes with this distribution.
As you can see there are over 200 packages that will be included. This saves a lot of time in the long run. This ditro also enables you to update all these packages with one command. I will be showing you this in part 2.
Step 2: Running the Installer
Go to the folder where you downloaded it to and double click to install. Them click run.

Click Next

If you agree click I agree.
Please read the agreement and if you don’t have any problems with it click agree to move forward.

Click whatever is appropriate and click next
You can either have this available to you or everyone the uses this computer. Choose what is appropriate for your situation.
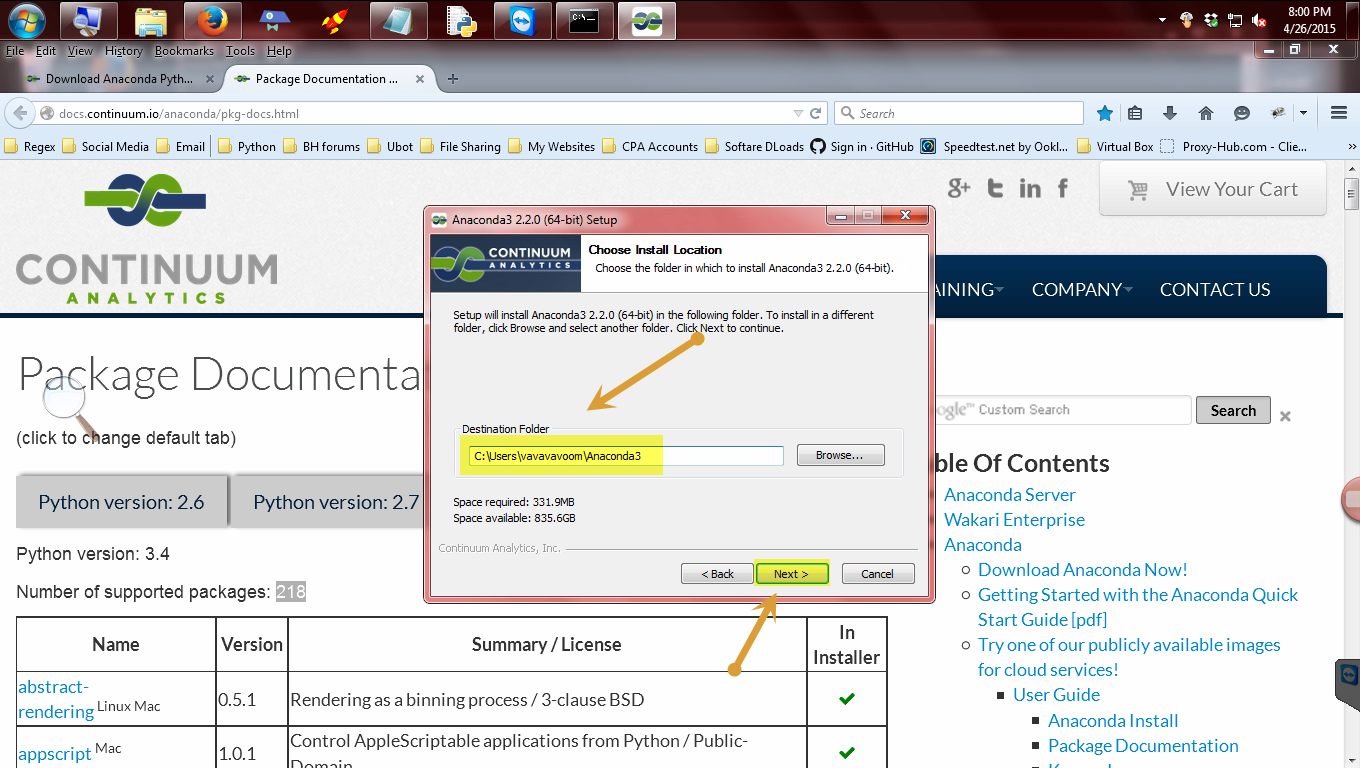
I strongly suggest you keep the default location until you know what you are doing.
Otherwise feel free to put it where ever you wish.

Check the box highlighted and click install. This may be checked already.
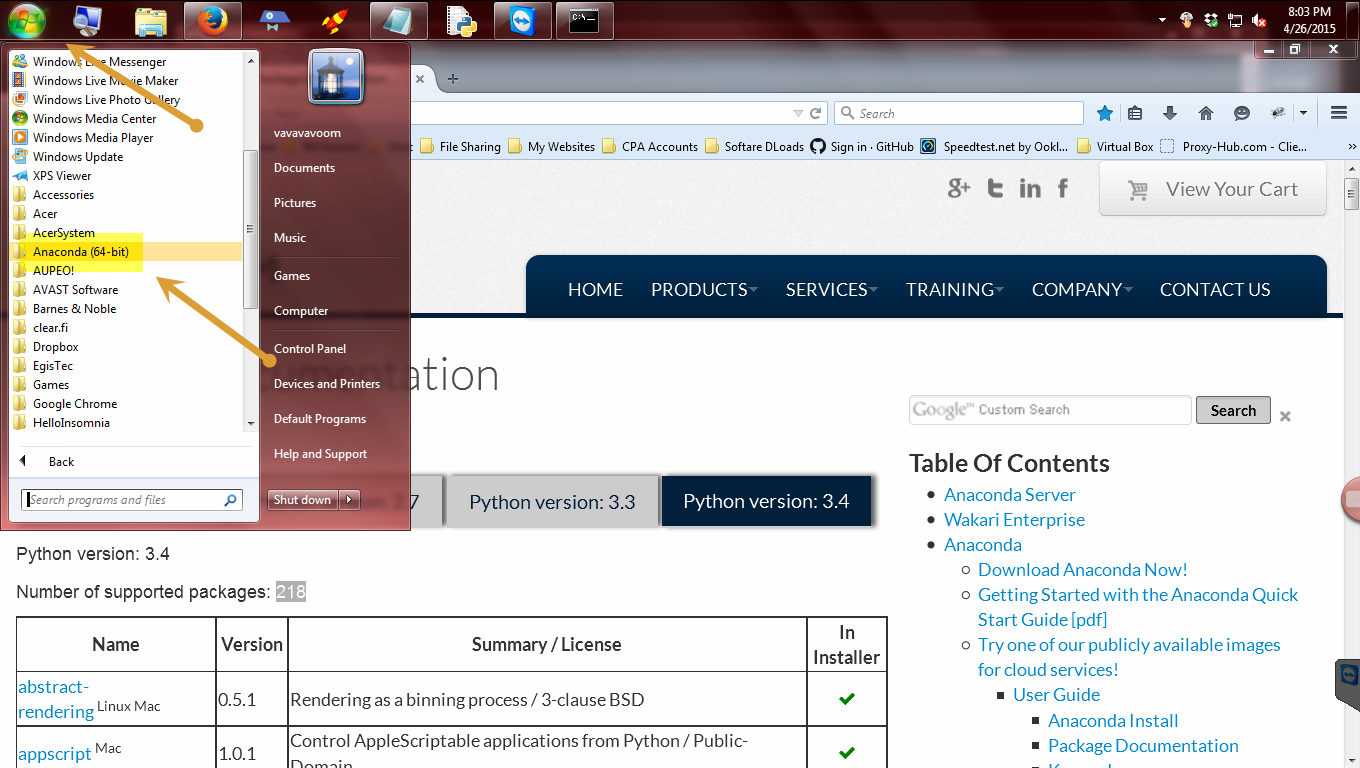
After installed click Start or press windows key.
Then click Anaconda. You will see all the cool goodies that comes with this distribution (distro) too!!
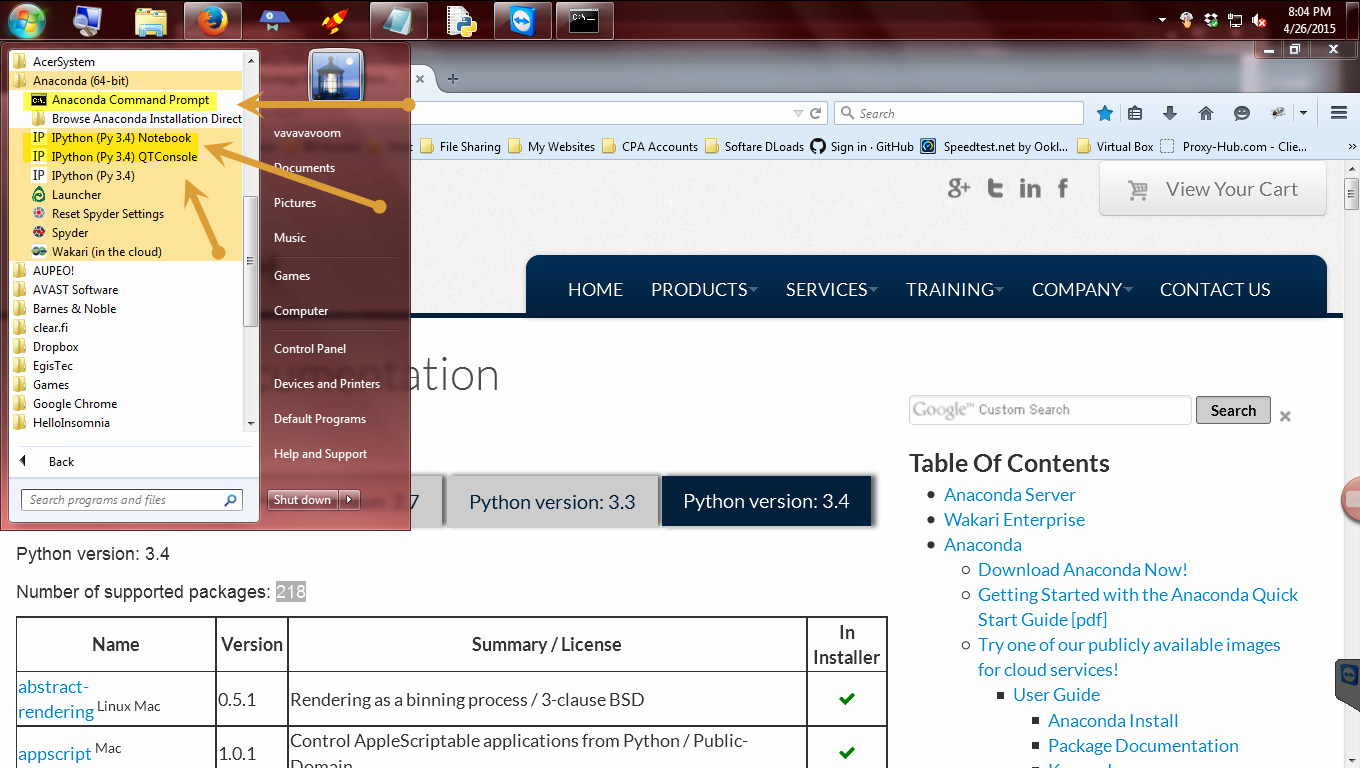
See all the cool stuff we will be playing with?
You should see the Ipython Notebook, Anaconda command prompt, Ipython Qt console (interpreter) and much more. These will be the focus of the upcoming tutorials on Python 3.4+. Please watch part 2 to see how to install, update packages and more!!
Continued in Part 2
Or visit thebotdoc Youtube channel to see all my tutorials.
You are welcome to follow me on Twitter @CodeDocta
Or please feel free to join the conversation over at our Facebook page
Also please check the resources page for Python tutorials I have found helpful along the way and many more useful information.
Thank you for reading and have a Pythonic Day!

You must be logged in to post a comment.